5 Common Audio Recording Mistakes (and How to Fix Them)
Good video can survive with less-than-perfect visuals, but bad audio? That’s a dealbreaker. Whether you’re recording a podcast, creating YouTube videos, or producing social content, poor sound quality instantly hurts your credibility. The good news is most audio problems come from small, avoidable mistakes and this guide will help you avoid these common problems and record audio like a pro.
Here are five of the most common audio recording mistakes and how to fix them.
1. Recording in a Noisy Environment
The mistake: Background hum from fans, traffic, appliances, or even neighbors can sneak into your recording. Microphones behave differently than eardrums, so these distractions may still be captured by your microphone, even if your ears don’t pick them up naturally. Audiences will forgive imperfect visuals, but they won’t fight to hear your voice over distractions.
The fix:
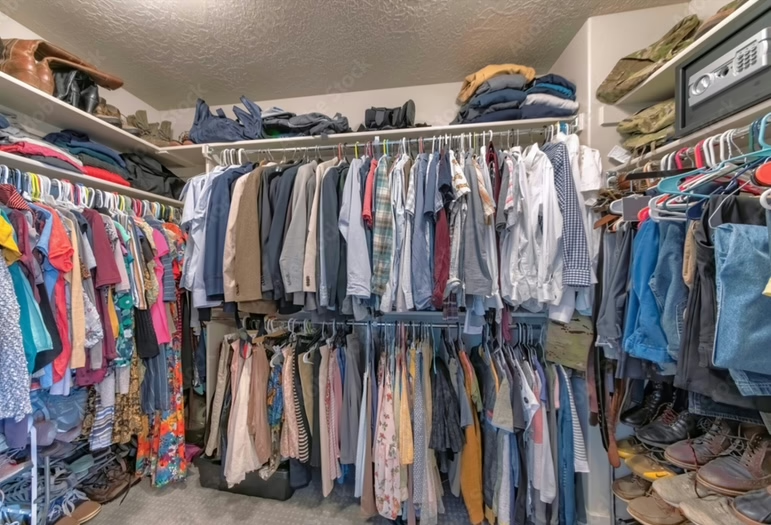
- Record in the quietest space you can find (closets with clothes work surprisingly well).
- Silence appliances before hitting record. AC units and furnaces are the most common background noise when recording at home. Turn them off while recording.
- Use directional microphones (like cardioid or shotgun mics) to capture only your voice.
- Apply noise reduction in editing software if needed, but don’t rely on it as your only solution.
A Perfect At-Home Recording Studio
2. Poor Microphone Placement
The mistake: Being too close to the mic causes distortion and plosive pops, being too far makes your voice sound thin and echoey. Placement matters as much as the mic itself, so do some test recordings to find the best location for your mic.
The fix:
- Position your mic 6–12 inches from your mouth.
- Use a pop filter or foam windscreen to soften harsh consonants.
- Angle the mic slightly off to the side, rather than pointing it directly at your nose.
3. Ignoring Room Acoustics
The mistake: Even the best mic will sound bad in a room with hard surfaces. Reverb and echo make your audio feel unpolished and “cheap.”
The fix:
- Choose smaller rooms with less echo.
- Add soft furnishings: rugs, curtains, blankets, or acoustic foam. If only recording audio, a closet full of clothes produces close to recording studio quality sound dampening.
- For mobile setups, try using a portable isolation shield behind your mic.
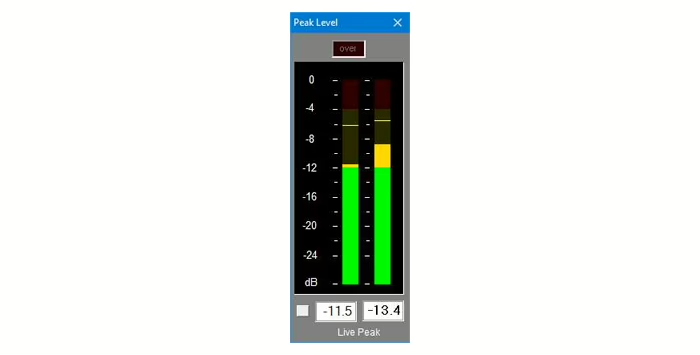
4. Recording Levels That Are Too High or Too Low
The mistake: Levels that are too hot cause clipping and distortion, levels that are too low sound weak and noisy. Many beginners don’t check levels before recording, leading to problems later.
The fix:
- Aim for peaks around -6 dB on your recording meter.
- Do a quick test before recording the real thing. Dampening or boosting a signal in postproduction affects all of the sound captured equally which can produce varying results.
- Set proper gain staging by adjusting your interface or preamp so the mic isn’t doing all the heavy lifting.
Ideal Audio Levels for Clean Recording
5. Relying on Post-Production to Save Bad Audio
The mistake: Thinking “I’ll fix it in post” almost always ends in frustration. Editing software can clean up small issues, but it can’t completely repair poor-quality audio.
The fix:
- Focus on capturing clean audio at the source.
- Treat editing tools as enhancements, not magic erasers.
- Build good recording habits and share them with your guests when collaborating.
Final Thoughts
Great audio doesn’t come from buying the most expensive microphone. It comes from preparation, good habits, and avoiding these common mistakes. By controlling your environment, placing your mic correctly, and recording at proper levels, you’ll instantly elevate your content.
Pro tip: The best way to improve your sound? Record a test clip, listen with headphones, and adjust before you hit record for real. A 30-second check can save hours of editing.